
Handouts and Worksheets in PreTeXt
We all know that PreTeXt is great for writing textbooks. But did you know that it can also be used to create small, standalone course materials?
Perhaps you want to create an in-class activity to engage your students in group work. This might require a printout with some questions separated by space for them to write. Or maybe you like to use guided notes, providing your students partially completed outlines for the content of your lesson, with room for them to fill in details.
PreTeXt has had a <worksheet> element for a few years, but the most recent release (version 2.28) now also includes a <handout> division that lets you add workspace to much more than just exercises. Plus, new styling for the web output make both worksheets and handouts print reliably directly from your browser. Below, we will explore these new features and I’ll share some tips for authoring course materials.
From web to paper
The distinguishing feature of handouts and worksheets is that they are meant to be printed and written on. Of course, in PreTeXt you can create a PDF just as easily as a webpage (both from the same source), but providing only the PDF for students raises accessibility concerns. Instead, why not provide students with the accessible web version and let them print a copy directly from their browser.
Take a look at the handouts in the sample article (or if you prefer the collection of worksheets). Every handout and worksheet division will get a “print preview” button next to its title:
![]()
The print preview will show page layout as it would be printed, including any workspace between content. You can toggle the paper size between US Letter and A4, and choose to highlight workspace, which is useful if you are trying to author a worksheet and want to fit things onto a page better.

Printing from this page will should give you an exact replica of the print preview. If you print with A4 paper, you will want to ensure that you selected the A4 size on the preview, and also that the print dialog has A4 set as the paper size (and similar for Letter, of course). You could also “Print to PDF” from the print dialog if you want an electronic version you could annotate with a tablet.
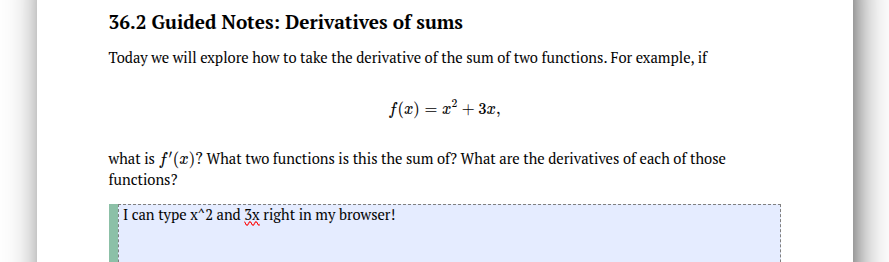
One more tip: inside any authored workspace, you can type text that will be included when you print. The screenshot below has “highlight workspace” turned on so you can see the area better, but this isn’t required to enter text in the workspace.
Tips for authoring
The handout and worksheet elements in PreTeXt are types of divisions, so they should be placed inside a PreTeXt document just like you would a section or subsection. They get a title in the usual way, and they can contain pretty much anything a section can (but no further subdivisions). Here is an example of how you might structure a handout.
<handout>
  <title>Day 1 Guided Notes</title>

  <p workspace="2in">
    Warm up: Use the limit definition of the derivative to find <m>\frac{d}{dx} 4x^2</m>.
  </p>

  <definition workspace="1in">
    <statement>
      <p>
        The derivative of a function <m>f(x)</m> is defined as...
      </p>
    </statement>
  </definition>

</handout>
Specifying workspace
You can specify workspace as an attribute on pretty much any top-level element, and some more nested elements as well (if you find you need workspace on something that isn’t working, get in touch on the pretext-support google group). Workspace can be specified in inches (workspace="1.25in") or centimeters (workspace="2cm").
You should think of the workspace you specify as a minimum amount of space. You will notice that if you toggle on the “highlight workspace” in the print preview, there will be thin green bar on the left; that shows the amount of workspace specified in source, but often the actual rendered workspace is taller than this. Workspace is added proportionally on each page.
Multiple pages
If a handout or worksheet contains more content than will fit on a page, the print preview will try to distribute the content as equitably as possible among the smallest number of pages it needs to accommodate the content an minimum workspace. This might lead to unexpected or undesired breaks between content you want on the same page. There are two ways to address this.
-
Modify the amount of workspace on your elements to fill up the pages as desired. This is where the “highlight workspace” feature is very helpful. Try to get the green bars to match up with the rendered workspace for the page fitting you want. If you have an element that you want to bring back to an earlier page, you will want to both decrease workspace on elements before it and increase workspace on elements after it.
-
Divide the handout or worksheet into
<page>elements. This will shrink workspace that is too tall to fit onto the requested page. Note that this is not a viable option if you want to split a page in the middle of a PreTeXt element, such as having a project with the first tasks on one page and the last tasks on the next (but perhaps it would be better to redesign your worksheet for pedagogical reasons anyway).
One warning: the algorithm for page breaks is different for the print versions you get from a web target compared to a pdf target. If you want to make worksheets look identical in both output formats, you will need to tweak the above so both give you the look you need.
Margins
By default, PreTeXt gives 0.75” margins on all sides of a page. You can modify this in the publication file (see the PreTeXt Guide) or on an individual handout or worksheet using attributes on the division. For example,
<handout margin="1in" left="2in" top="0.5in">
will put 1 inch margins on all sides, but override that with 2 inch margins on the left and 0.5 inch margins on the right. The margin attribute is not required; it is just a shortcut for changing all margins from the default without needing to use all four of top, right, botton and left.
By the way, the default behavior is to use these margins for both web and PDF versions, but if you don’t want margins to change for LaTeX, there is a publication file option for that too: Subsection 44.3.8: LaTeX Worksheet Options.
How will you use this?
As I’m getting ready for the start of the semester, I’m thinking about how I can use handouts and worksheets to improve the experience for my students. I haven’t ever used guided notes, but I do like the idea of having partially typed notes that I can write on using my tablet, projected in the classroom (I would print-to-pdf, and teach my students they could do the same if they wanted to).
I might also create other course documents in PreTeXt now and put them in these divisions to make printing easier. I can use handouts for the syllabus, formula sheets, and study guides (even if these don’t need any workspace, I can control page layout easily). Worksheets would be good for in-class activities, homework sets, quizzes, and even exams; anything that naturally has exercises that need workspace.
Of course, if you do happen to have a textbook written in PreTeXt, providing these directly in the book is an excellent use case. The new edition of Active Calculus has implemented worksheets for its preview activities, such as this one.
Is there a use case I’m forgetting? Are there features you wish these division had? Let me know in the comments below or reach out on pretext-support.
Comments