
Making Partially-Handwritten Slides Accessible
The Problem
As instructors work to make digital course materials accessible to individuals who use screen reader technology, a common question is how to approach slides. One common instructional strategy in mathematics courses is to use partially-completed slides that get annotated live during class by writing on a tablet. Some instructors feel that using this approach strikes a balance between handwriting everything on the board, which has the potential downside of spending significant time copying problems onto the board instead of discussing how to solve them, and building intricate slide decks that allow the instructor to step through every single step, which has the potential downside of not demonstrating to students how the instructor might want them to write by hand on graded assignments.
Tools such as Microsoft PowerPoint and Google Slides can be used to produce accessible slide decks, and the instructor can leave space to handwrite materials during classtime. Many instructors provide this version of their slides to students electronically before class, as then students who like to take notes on a tablet can fill in the blank spaces along with the instructor. However, the dilemma is then to figure out how to make the instructor’s annotated slides available to students after class. In the absence of digital accessibility requirements, one could just export the hand-annotated slides from their note-taking application and post to the LMS for students. However, most campuses are interpreting handwritten digital materials as not complying with digital accessibility requirements.
An Idea for a Solution
Especially in large-lecture courses where I might get lost in the algebra of doing an example in class, I prefer to walk into class with some version of what my annotated notes will look like anyway. When I was still using LaTeX’s beamer package to prepare my slides, I would go through and annotate them on my tablet before class and carry a printout of those with me to class. (Having a hard copy of the slides with me is also helpful for when I suddenly blank and forget what order things are coming in the slides.)
The experience of already having an annotated version of my slides pretty naturally led me to consider how I could have a typed version of the annotated slides available for my reference before class. One approach would be to prepare the annotated slides in PowerPoint or Google Slides, make a duplicate, and then go through and delete the parts that will be handwritten by the instructor during class. However, maintaining two versions of a file in a format that is not text-based comes with downsides. If you change one file, you have to ensure that commensurate changes are made to the other file, which seems tricky. LaTeX’s notoriously inaccessible PDFs (especially for mathematical content) ruled out using LaTeX as a solution, even though it does allow conditional inclusion of content to produce two output versions from a single text-based source file.
My Solution
I’m an experienced PreTeXt author, having been using it extensively since April 2016. I knew that PreTeXt
- provides accessible HTML output,
- allows conditional inclusion of material, and
- can produce RevealJS slideshows.
Thus, I figured that there had to be some way that I could leverage PreTeXt to produce two versions of my slides, and I was correct!
PreTeXt manages conditional inclusion of material via the @component attribute, which can be placed on almost any element. (I probably discovered that it works in more places than the lead PreTeXt developer intended. 🤫) Any element that does not have a @component attribute is included in all versions, which is nice so you don’t have to put it on everything. Because I knew that I was going to be using this attribute a lot, I went very short on the names of my components. I settled on a for the annotated version of my slides, which I would print for my reference during class and then post for students after class, and b for the blank version of my slides that I would load onto my tablet and share with my students for their notetaking purposes.
Once I made that decision, it was pretty easy to move things forward. I created two publication files. The one for the annotated slides contains <version include="a" /> inside the source element, while the publication file for the blank slides contains <version include="b" />. My project.ptx file includes two entries for the slides, one for the blank version and one for the annotated version. Usually, I include/exclude entire paragraphs coded as the p element in PreTeXt. Because a completely empty paragraph sometimes behaves incorrectly, if I need to include a blank paragraph as a way to leave some vertical space, I will use <nbsp/> inside the p element. PreTeXt’s sidebyside also provides a convenient way to produce a column structure inside a slide, although it can take some experimentation to understand the width and some aspects of figure sizing in a PreTeXt slideshow.
It is even possible in some circumstances to leave blank space in the middle of a paragraph through careful use of PreTeXt elements. For example:
<p>
  An integer <m>n\gt 1</m> is <term>composite</term> provided that there exists
  an integer <m>m</m> such that
  <m component="a">1\lt m\lt n</m>
  <m component="b"><fillin characters="5" /></m>
  and
  <m component="a">m\mid n</m>
  <m component="b"><fillin characters="5" /></m>
</p>
This code will leave a blank space (with some styling options that can be controlled in the publication file) in the blank version. I wrote on my tablet to fill in those blanks while in class, but the annotated version has a properly typeset and accessible version of the content. To leave space to write in words, you might experiment with putting those words inside an em tag and then using an m containing fillin for the blank even if what you will be writing in the blank isn’t math.
Examples
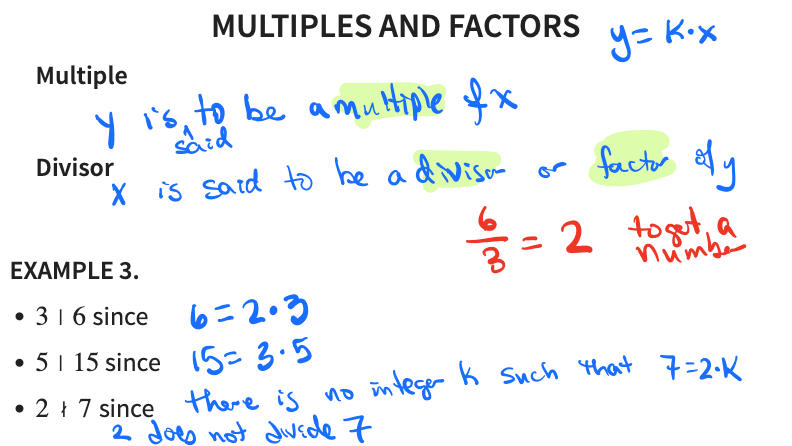
To see what these slides look like, I’ve posted a small example of both blank and annotated versions of slides. To navigate these slides online, look near the bottom right of a slide and press the right arrow to see a new topic and press the down arrow to see the next slide within the same topic. You can also use the arrows on your keyboard to navigate back and forth and up and down. A screenshot of my real in-class annotations of one of these slides is included below.
A Github repository with a very small slide deck is also available for you to use as inspiration as you develop your own slides.
Not Just Slides
This approach to maintaining two versions with conditionally-included content from a single source file can be applied to other PreTeXt document types. For example, this semester, I’m teaching a smaller class where I prefer to have something more like guided notes that I can fill in on my tablet during class rather than a slideshow. I use a book in my PreTeXt source with each chapter corresponding to a chapter of the textbook. Inside each chapter, I place a handout for each class meeting and use the @workspace attribute to leave blank space to write in during class. When it doesn’t make sense to put the annotated content inside a solution or something similar that has built-in PreTeXt features for revealing later, the @component approach can be used to produce two versions. If you’re using the PreTeXt-CLI’s pretext deploy option to post to Github pages, then you can use the @deploy-dir attribute on multiple target elements so that you can deploy both the blank and annotated version to students.
Further Extensions
I’ll leave as an exercise for the reader the idea of using something along the lines of @component="day01" on a high-level element such as section in a slideshow or handout in a book of handout elements to gradually release materials to students if you’re the type who manages to prepare a course more than one day in advance (or when you teach the course again in a later semester and can reuse materials). The @include attribute on version in the PreTeXt publication file can take a list of things, so you might use @include="b day01 day02" to include only the high-level elements tagged as day01 or day02 and then only the things tagged with b inside those for a blank version.
Comments